
Basic Stitches
You can get started making your own gear knowing nothing more than how to sew a straight stitch, but knowing a few extra stitches goes a long way to building great gear. Here are the essential stitches to know for MYOG Angler projects.
Straight Stitch
The straight stitch is the workhorse of every sewing project. This is the quintessential sewing stitch that can be sewn by hand or machine, and makes the basis for all of the connections you sew to complete your projects. MYOG Angler projects may reference two different versions of the straight stitch, each used for a different purpose.
Top Stitch
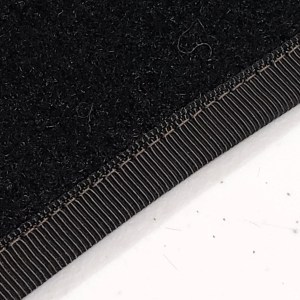
The top stitch is basically your finishing stitch, and it may or may not actually be on “top” of the fabric. This stitch is 2.5-3mm long for strength. A top stitch is generally used when connecting components of your project together, and again as you sew in the seam binding, where applicable. Top stitches make the final, permanent connection between panels or pieces.
Baste Stitch
A baste stitch is basically just a straight stitch that’s used to hold pieces together temporarily until a permanent top stitch can be placed. We use these stitches to connect the different fabric pieces together that become our main panels or components, which later get joined together with top stitches to form the final project. What makes a baste stitch different from a top stitch is the length of each stitch. We recommend 4-5mm for baste stitches, which is longer than the 2.5-3mm length for tip stitches
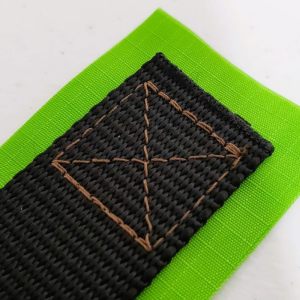
Box X Stitch

A box X stitch is common in MYOG for making a reinforced connection, commonly between things like webbing straps and fabric. A box X stitch is basically what its name implies: A straight stitch sewn into a square “box” pattern with an “X” in the center. This arrangement of straight stitches creates a connection that spreads stress over a large area. This enables a strong and durable connection at high stress points like where shoulder or waist straps connect to a bag.
If you know how to do it, you can create a solid box X stitch in with one uninterrupted stitch. First, sew a square shape with your stitch, turning the piece as you sew each right angle. Then, from the first corner, sew the X shape in, stitching over the first stitch line at the bottom and top of the box.
- Sew parallel to the zipper tape on each side of the tab, sewing through the tabs and zipper tape, connecting the two tab halves.
- Open the zipper to get the slider out of the way, and repeat the process on the other end. Make sure to use extra care to keep the zipper tape halves aligned, since it will be a bit harder with them open than it was closed.
- You now have a finished zipper with about ½ inch (13mm) of fabric on each end, ready to sew into your next project.
Zig-Zag Stitch
The zig-zag stitch is a common and useful stitch that has some advantages over the straight stitch in certain situations. It’s also fundamental to creating bar tacks, which we cover next.
A zig-zag stitch is basically what it sounds like- a stitch that zig-zags back and forth, as opposed to the straight stitch which proceeds in a straight line. This stitch is useful for situations where you want the stress of the stitch to be spread out a bit to prevent pressure points along the seam. The zig-zag stitch is also useful on stretchy fabrics because the flexible nature of the stitch makes it able to flex as the fabric stretches. Zig-zag stitches are also useful for finishing the edges of fabric.

Bar Tack

Bar tacks are useful for adding reinforcement to areas of high stress. MYOG Angler projects may use bar tacks in demanding locations such as where webbing straps connect together or where a webbing strap connects into a seam between two panels. A bar tack is easy to create because it’s basically just a very short zig-zag stitch.
To create a bar tack, you simply set your sewing machine to a zig-zag stitch, and reduce the stitch length to .2mm or .3mm or so, and the width to between 2mm and 3mm.
Practice makes perfect
There are a few important things that make a stitch good and strong, like thread tension matched to the fabric and situation, stitch length and width, and thread choice. But it’s important to remember that an ugly stitch can be strong, and a perfect-looking stitch can be superficial and weak. Appearance doesn’t matter, and what we’re looking for at the end of the day is just a strong stitch. Your stitching will get better, more consistent, and cleaner the more you sew, but in the beginning, your stitches may not come out looking that great. That’s totally OK, and no reason to get discouraged.
So get some fabric scraps and start practicing these stitches. I’m sure you’ll find yourself sewing solid stitches in no time, and you’ll be ready to start your first MYOG project.
Continue building your skills, or get started on a project!

Guides
Learn how to build zippers, bind seams, and more

Patterns
Find a FREE pattern for your first project.

DIY Projects
Find DIY inspiration here.
Don’t miss out!
Sign up to be notified when we release new content and patterns. We respect your info and won’t spam you. You can unsubscribe anytime.
